


Introduction
Setting Up
For anyone who's been following my to-do series, then this article builds upon this post where I discuss setting up a free virtual machine on Oracle Cloud, and from there setting up Docker with an application called Portainer, to help manage containers running on that virtual machine instance. Even if you haven't been following the series then feel free to head there if you would like to get set up with a free Oracle Cloud VM or do not currently have a docker host set up. Either way, it's by no means essential for following the rest of this article.
What is a Container Registry
Put simply, when we want to use Docker to deploy applications we build container images. We can use pre-built container images, or create our own. Most often we will do a combination of the two, as containers are basically prebuilt images layered upon existing images and repackaged. Once we have a final image, we then need somewhere to store it to deploy it. Thats where a container registry comes in. The most popular and well known of these is the default Docker container registry Docker Hub.
Source Code
Source code for our To-Do application at the end of this step can be found here.
Installing our Registry
There are a number of options for container registries our there, some of the most popular include Registry from Docker themselves, and VMWare Harbor. For this walkthrough we will use Registry as it is a simple implementaation which provides us with all the functionality we need for this to-do series of articles.
As Registry is in itself deployed as a container, and we already have Docker set up on our existing virtual machine, all we need to do is log into our virtual machine instance and deploy the Registry container.
docker run -d -p 9444:5000 --restart-always --name container-registry registry:latest
With above command, we launch the container in 'detached' mode (-d), specifying that we want to use port 9444 of our local machine to access the container via it's internally exposed port 5000 (-p). We also provide the restart policy, name the container, in our instance to container-registry and tell Docker to use the latest version of the Registry image.
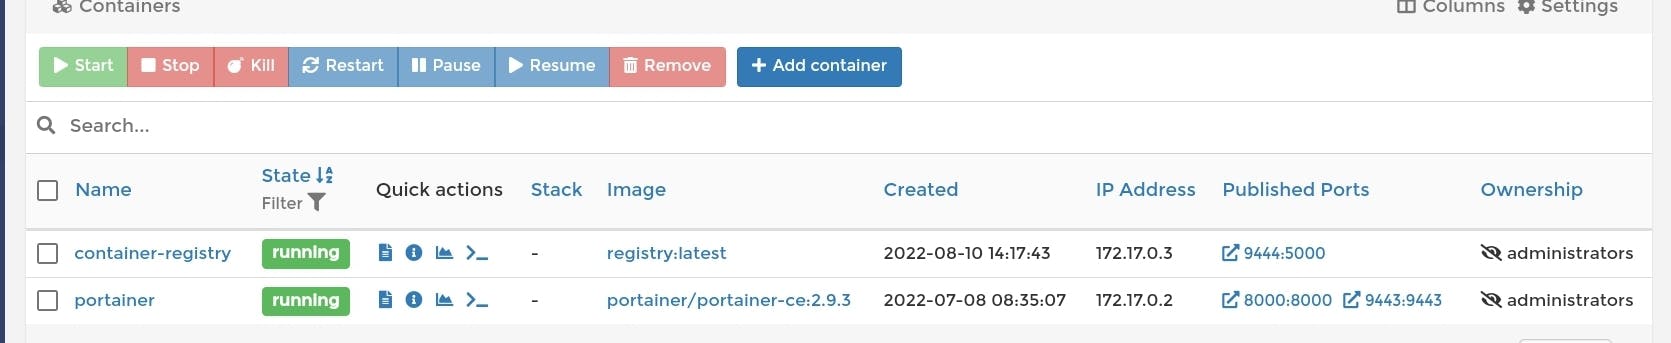
Once deployed, if you have previously installed Portainer you should see it in the list of running containers:
But you could just as easilly check the status by entering the following Docker command:
docker ps
Adding Docker Support to Our To-Do Application
To add docker support we firstly need to create a dockerfile for our application.
Add the following to the folder containing the csproj file of your application. You will most likely need to change the paths and project name to match the structure of your application:
FROM mcr.microsoft.com/dotnet/aspnet:6.0 AS base
WORKDIR /app
EXPOSE 80
EXPOSE 443

FROM mcr.microsoft.com/dotnet/sdk:6.0 AS build
WORKDIR /src
COPY ["davek.dev.todo/davek.dev.todo.csproj", "davek.dev.todo/"]
RUN dotnet restore "davek.dev.todo/davek.dev.todo.csproj"
COPY . .
WORKDIR "/src/"
RUN dotnet build "davek.dev.todo/davek.dev.todo.csproj" -c Release -o /app/build

FROM build AS publish
RUN dotnet publish "davek.dev.todo/davek.dev.todo.csproj" -c Release -o /app/publish

FROM base AS final
WORKDIR /app
COPY --from=publish /app/publish .
ENTRYPOINT ["dotnet", "davek.dev.todo.dll"]
This dockerfile explains the steps we go through to build our application container as follows:
We first specify our base image. This is the image that contains the required runtime libraries so run our application. In this instance we are deploying to and ASP.NET image running on .Net 6.
We then specify a build image. This image contains all the required SDK libraries to build our image. We are actually going to be building our image in one container and then deploy or publish it to another.
We then copy our csproj file and run a dotnet restore against it, to pull in any additional libraries we may require.
We copy the remaining files from our project into the container, and build our application.
We publish our application to a 'Release' directory.
We copy our published files into our 'final' container and tell the container that when started, to launch our application through the entrypoint directive.
We can now tell docker to use the above file to build our image. If you have docker already installed on your development machine then we can run a docker build as below. If you don't have docker installed, Docker Desktop can be downloaded here.
docker build -f .\davek.dev.todo\Dockerfile -t to-do:1.0 .
Note: I am running this from a command prompt in my src directory. You may need to alter file paths to suit your existing application structure.
Using the -t command I also set an image name and version at the time I build the container image.
Uploading our Image to our Registry
Once we have an image we need to tag it with our registry details. We can do that simply by re-tagging the container we just built as follows:
docker tag to-do:1.0 [IP address of vm]:[port of registry]/to-do:1.0
If you access your docker host using a domain name you can use that instead if the IP address.
You can then push the container to your repository using the tag specified in the previous command:
docker push [IP address of vm]:[port of registry]/to-do:1.0
Note: If you get an error of 'http: server gave HTTP response to HTTPS client' you may need to add the registry to the insecure-registries config in the Docker Desktop > Docker Engine json config and apply/restart.
This should start uploading the image to your own registry.
Deploying from our Registry
Pulling the Image
Now we have uploaded our image to our repostory, we can pull our image with
docker pull localhost:[port of registry]/to-do:1.0
and then when we run our docker image command our new image should appear in the list.
####
We can then launch our container with:
docker run -d -p 8080:80 --restart-always --name to-do localhost:[port of registry]/to-do:1.0
The application should then be available at localhost:8080 although, if using the current example application then we will not currently have any accessible endpoints to view. However we can see it in our portainer instance or our docker ps output.
